There are more alternatives to use than just drywall and plaster. Shiplap is a term that has been used a lot lately, and after seeing how much it has started trending, I wanted to share with you guys some very creative ways to make your own, and by doing it this way you will save a lot of money. When it comes to making your own shiplap, it can be a very lengthy process, and you must make sure that your edges are completely straight, because on board uneven can cause major gaps and imperfections into the lay out of the wall, ceiling, or siding on the outside of the residence you are applying this to.
What is shiplap?
Shiplap is wood planks or paneling with tongue and groove edges that overlap each other as it is placed horizontally on a wall. There are a few different ways you can make a “shiplap” wall, and this is what we have researched with our friends from 84 Lumber, and wanted to share with everyone today. Most shiplap style boards have a rabbet or notch routed on the edges. This was traditionally done, so when placed properly, it would make a water tight seal, beings caulking and other water proofing methods were not around in the late 1800’s and early 1900’s when historic homes were built. This is why you will find this style of wall coverings or exterior siding hidden underneath more recent renovations or existing walls and siding.
Because of the low cost it brings, it has started making a famous come back, and you will find frequent mentions in HGTV shows, blogs, and web designers. It looks elegant, and is very affordable, giving you the best of both worlds. We wanted to mention two different style of shiplap designs today, and the power tools we used to make this happen. Granted, buying this lumber already pre made would be a luxury, but you will pay for it in the long run. If you have a very basic knowledge of power tools, we will help you get your shiplap project taken off.
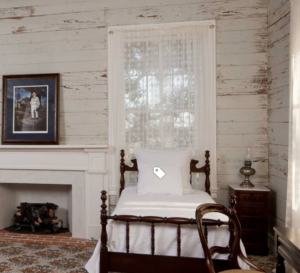
Traditional Shiplap Walls – you can use a cheaper type of wood such as pine, and have it in 1×6 planks, and depending on the length of the wall, you typically will want to cut it 6 to 8 feet in length to get a good coverage on the walls. Because ship lap is 3/4 thick, its a great replacement for drywall, and thats what we have done here. We took 1×6, used a routing table, to make our opposite rabbet notch, and placed them together to get a clean and amazing fit. Here is a house we did which was a plantation home built in 1875. To do this entire room, we had to use about 25 boards stacked on top, and we had to use double length so a total of around 50 1×6 pine planks. We started from the bottom up, and slowly did each section of the wall. When we got towards the top, we had to take a board that was 6 inches tall and trim it down to 4 inches tall, so we had an exact match with the ceiling. The beautiful thing about shiplap on walls is the options as well. You can sand it, smooth it out, and stain it. Leave it in its natural state, or even paint it! For this particular client, they wanted a rough paint, giving it a classic, rustic feel of the true south.

SHIPLAP WALLS
Ceiling Coverings With Shiplap – The same process applies here, you will need to get your boards measured, and do the rabbet notch, however, instead of stacking on top of each other, you will be applying this to the ceiling, and we nailed them into the 2×4 and 2×6 studs of the attic subfloor. By doing this, the boards were held into place just fine.
Exterior Siding Shiplap – is another creative way to utilize this style of lumber. However, if you live in an area that gets rainfall, we recomend to use 1 1/2 to 2 inch thick planks of wood, because this is going to be the protecting barrier between the outside elements and your home. Also waterproof and treat this lumber with more care, beings it will be constantly outside. However, just like when shipbuilding or building roofs, you want to make sure you have a water tight seal. This is why the traditional rabbet notches on each horizontal end was made. It required less waterproofing as the form naturally formed a tight fit.
What if I can’t afford traditional shiplap?
We are glad you asked! Because we have a few secrets we wanted to share with you from our friends at 84 lumber!
You can make your own faux shiplap as well. I am going to give you instructions on how we did this, so you can try and apply this to your own project as well. You can use this technique on ceiling, walls, or outside siding. However, you need to keep in mind, that the procedures we are going to give now, are for 1/4 inch thick or thinner panels of wood. It maybe a good idea to use thicker pieces of planks, if you decide you wanted to apply this on the outside of your home!
What tools do I need to make my own faux shiplap?
You will need a good fresh blade on your saw of choice, such as a jigsaw, circular saw, or if you have the skill, a reciprocating saw. (yes it can be done correctly!) I purchased a really nice DeWalt jigsaw from Amazon, and used a finer tooth blade to give the edges of the plywood a splinter free cut.
You will need to go out to your local home improvement store, or Lowes, Home Depot, Ace Hardware, etc. Purchase 4×8 sheets of plywood, depending on which project you are working on, it may be a good idea to go ahead and determine the thickness ahead of time as well as how much lumber and plywood you will be needing for this project.
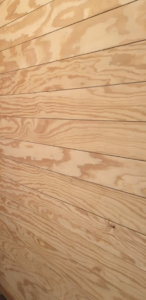
Next, cut your pieces of ply wood in either 6 inch or 8 inch (which ever you prefer) planks of wood. You can decide how long the planks will be but if you are cutting along the side that is 4 ft wide, then you will get around 16 to 20 planks of wood. Do not panic if you run out of planks, this process is so easy, you can go and purchase more pieces of plywood to make more!
Plywood can come pre sanded for a little bit more, and this is what we decided to do, because we were putting this in our daughters guest bedroom that we remodeled for her, and this is how smooth it turned out.

faux shiplap
Using simple math, we determined how much was needed and because the wall was 14 feet wide, we actually had to make shorter than 8ft pieces, to get a smooth fit on the wall. However, once it was completed, we went ahead and got our pieces nailed up to the wall, using a pneumatic air gun, to keep the visual of the “floating” planks of wood in focus here. It was a great alternative compared to using the expensive tongue and groove style boards. You can also add very thin pieces of wood in small strips along the bottom of each plank to get it that more “traditional shiplap look” as well.
We too a strip of veneer that was only 1/8th inch thick, only raising the bottom part of the plank just slightly, and glued these strips to the actual planks of plywood we had cut up. However, you can use a nail for this as well, because it was very time consuming placing this on 32 boards that went into one of our previous clients home, and glue takes time to cure and dry properly so it can be sanded smooth and blended to look like it belongs on that piece of wood.
Can You Paint On Shiplap?
No matter who you talk to, everyone has their opinions on what should and should not be painted. However, I will mention, even if you get the smooth hard pine wood, or a plywood plank style wood, use an electric sander which can be purchased on Amazon, or sheets of sandpaper and slowly move to a fine grit. If you just slap paint on these boards, it will have a rough texture to it, and will be highly visible in the paint you use.
We took an electric sander and smoothed out the planks, which gave us the smooth texture finish we wanted, wiped the boards off of any residual sawdust, and painted over it no problem at all. You can buy plywood pre sanded, but even when we used these pieces, we still had to do our own sanding, making me feel like we should have saved the extra $4 per sheet of plywood, and done this ourselves.
Another amazing option with real or faux shiplap, is to let the natural wood present itself to those who view it. Get a nice solid stainer, which will protect each surface, and give the wood a rich dark color that everyone can enjoy. A couple of our clients also have requested we leave the wood as is. It is your preference, we just felt it would be worthy of mentioning in our article.
Conclusion
Working and using shiplap real or fake, can be a very elegant and inexpensive way to add more character, coverings, and protection to your homes that you have worked so hard on, and for in your life. When we did our research, and asking for our experts at 84 Lumber’s opinions, we learned tons. Which when taking on such a project, you need to gather as much information as you possibly can. Nothing will ever beat the personal feel of accomplishment when you are finished with your shiplap project, and get to show it off to others. Hard work has always and will continue to pay off in the long run.
