
What Tools Will I Need to Repair My Mobile Home Floors?
Here is what my bathroom looked like before the repair started…
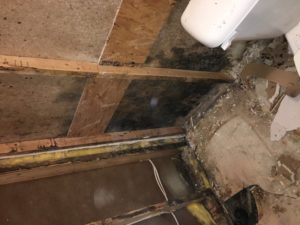
This past week I took on a very large responsibility to repair my own bathroom floor in my mobile home, and learned some very hard lessons along the way. But before I get into that, I want to share with you the situation I was facing and what led to this entire floor and subfloor that needed a full over haul and repair.
Most mobile homes come with very cheap materials from the factory, and even the “upgrades” you can get at your mobile home dealer, are not the “quality” they promise in the first place. The tub/shower that came with this mobile home was made of a very thin, cheap, plastic material. Someone who is heavy, or large in build, can easily crack or break the tub if you stand anywhere in a weak part of the tub/shower. What happened, was a small crack formed, and over the course of one year, water seeped into the floor, that was not covered (they ran linoleum up to just a few inches past the bottom of the tub/shower. If you own or have ever worked on a mobile home, you know that the floors are not plywood or sanded plywood, but a product called particleboard. It is literally saw dust, collected and recycled, that is mixed with a glue substance, and pressed to make a hard surface. Its a very cheap way to make a floor, and I was not very happy discovering this at all.
Checking the Damage
No matter the situation, before you do any type of repairs on your mobile home or house, you need to know what caused the damage. It would be pointless to repair everything, and the problem still be lurking around. In my case, it was the damaged tub/shower, but if a water supply line breaks, or the valves wear out, repair these immediately!
We first started the demolition of the bathroom. Learning that the water which saturated the floor and the drywall, developed black mold, and it was not just on the surface. Black mold is toxic, and can cause severe respiratory damage, and different health issues. After growing concerns, we needed to remove this immediately. We began from getting whats was ” on top” first. We started removing the faucets, shower head, and the cheap plastic covers that were just laid on top of the drywall. We then slowly removed the damaged tub, and slowly removed the drywall, and as we started looking, even the R13 insulation was covered in black mold or was flattened after being exposed to water. The particle board literally crumbled in my hands, and fell down under the sub floor, being caught by the plastic under wrap of the mobile home. After finishing the removal, all that was left was the bare bones of the 2×6 in the walls, the wiring ran for the electrical outlets, and the saturated subfloor. The semi-clean up process started from this point. I took a shop-vac I purchased on Amazon, and with the super suction power, I pulled out a ton of the debris out, and removed all the insulation from the wall, and under the floor. I got very lucky, and how my bathroom was set up, the line where the debris damage stopped 3 inches before the line that ran across the toilet. So we didn’t have to remove that at all. Because this was a weekend project, I capped the hot and cold water lines coming in, so we could turn our city water back on.
Prepping For The Repair
Before I get into the repair, I wanted to share a few things you should do before replacing and repairing your mobile home sub-floor and floor. The black mold situation needed to get under control. I threw out all the wood, drywall, insulation that I could find. But the 2×6’s and other items that I couldn’t throw away, I treated. I mixed 1 cup of water for every gallon of water. I know that was stronger than some mixture numbers you will find online, but I didn’t want to take any chances when it comes to this black mold returning. I mixed hot water, and bleach into my pump action sprayer that I also picked up on Amazon. Sprayed heavy, and took a paper towel to wipe off as much as I could. Then misted a nice coat of bleach/water onto the wood and other materials present in the bathroom being repaired. I used an industrial fan, and let it dry. Repeated this step of coating, and drying two more times. I then moved on to other things that needed to be done and prepped for. I learned that the drywall that was in my mobile home was put up by staples. The trim was held in place by the small thin nails used in pneumatic nail guns. So I removed every single staple and nail, and triple checked to make sure I was not missing any. Because when I go to rehang new drywall, it will come in handy to not get hung up on anything. Another final step I took was to look at any residual damage the water and saturation did to the sub floor as well.
Sub Floor Repair
What is a sub floor in a mobile home? Mobile homes have a platform in my opinion, which is a trailer, made of metal that the entire home is built on. Some are single wide, some are double and triple wides. The subfloor was built on this metal frame. While investigating, one of the 2×6 floor joists was split, and I could also see where water damaged different sections of the sub floor. The term is “toe nailing” the subfloor, where you reinforce the 2×6’s and put in 12 to 16 inch pieces so the new floor on top has something to grip and “bite” down on to when you screw the floors down. This will add plenty of stability and will also remain strong for the next few decades to come.
Instead of using nails, I bought coated 3 inch screws, 19/32 pre sanded ply wood, and 4 2×6’s. You will need some power tools such as a reciprocating saw, jig saw, circular saw, a powerful drill that has some power and torque behind it to drive the screws into the 2×6 floor joists.
Beings I did my drywall and new trim, I used staples too. But for the sake of this article, we are just going to talk about the experience with the floor. I will post other articles about the new shower install, and the drywall to finishing. I just wanted to document everything as I went along, to show you what I run into, and tips and tricks for working on mobile homes, or any home improvement jobs. Had it not been for my power tools, I could not have gotten this project done at all. I am very thankful I made the investment in them when I did.
I took two complete 2×6 and cut them in to 16′ pieces. Because with the floor joists running vertical, I put these pieces on the edge by the wall (where the edge of the plywood) this was to insure reinforcement in case the edges where the water damage was became or was weak. The term for this was “toe nail” I believe. Then I took two cut pieces and placed it on each side of a split floor joist, for added support as well. Most mobile home floor joists are 16′ inches apart. This is how I knew how wide to cut my pieces.
Main Floor
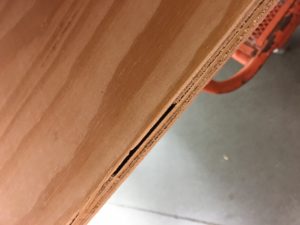
I went to home depot, and purchased a pre-sanded 19/32 or 5/8’s thick piece of nice strong ply wood. I decided to use plywood, instead of the wafer or particle board because I like to be safe than sorry. It never hurts to over do it if you have the materials and time on your hands. Before this install you will need to replace the insulation that was damaged. I bought a huge pack of the R13 rolls of insulation, 96 inches long, 16 inches wide. Now I did this because I needed to repair drywall, and there were a total of 5 rolls removed. I replaced 6. Because the extra warmth would never hurt, because in Kentucky the winter can get very cold.
To be safe, I measured from all four sides, to know the exact size of how big of a piece of wood I would need. Then I measured around where the notches will be for the drain, and the two water lines that run up from the floor. If you over cut or make the notches to big, its fine, you can stuff plenty of insulation around the holes and make sure when you lay your linoleum or floor coverings. I got lucky and there was not much of a gap at all. One other tip I would like to add before you move forward on laying the plywood down, is measure again and again. Take your time.
When you go to lay the plywood down, you need to carefully place the side with the notches in first. and lay down slowly. If it makes you comfortable, you can always do sections or pieces. Its what makes you feel comfortable.
This is 5/8th’s thick plywood
Floor Coverings
We went with a linoleum that is semi padded. This way we just measure, lay, and cut to fit. It was the easiest part of the process to be honest. It was fast and simple compared to the rest of the project. You can buy rolls of it at all kinds of different stores, Ollies, Home Depot. Anywhere.
Follow Up:
I will come in here and post the article for the drywall, and the shower installation as well. I will link it here so everyone will be able to read up on it. Because this was a journey that I am glad I am taking. I have learned so much, and knowing this type of thing will save you so much money. You can put the sweat equity in your home, the sweat you produce is worth something in the long run, when it comes the value of the home.
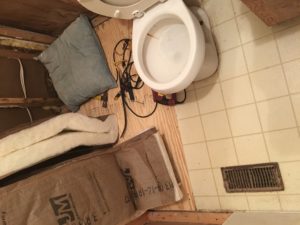
Here’s the current status of the floor after installation.
Conclusion (for now)
This was a very crazy experience for someone who has never even used a saw before. I am very thankful for the friends that gave me important advice along the way, and for YouTube, because there is so much information out there to help you. Which is why I wrote this article, because I want everyone to know that it is not impossible, and especially with water damage, the faster you repair, the less of a disaster it will be. Black mold is not to be taken lightly. Its very dangerous, and I am ashamed to admit it took me 8 months to get this repair done. Be vigilant. Even if you don’t have all the money to do so. You do not want your family and friends exposed to these dangers, and its also a good project to take on in your free time.
I saved a ton of money on my tools from Amazon. I linked some products in the article above. Obviously you need to buy your wood local, and screws are very cheap on amazon as well. This is what I used for my project here. If you take your time, and just like I realized, it doesn’t have to be done over night. However, winter is coming and I wanted to at least get the floor insulated and down, so no warm air would be escaping the house.
Use protective gear anytime you are messing with tools, or materials for construction. This was just a document of my experience, I appreciate you taking the time to read, and I wish you the best of luck on your construction or home improvement project!